An individual is a person, such as a passenger or someone who books travel. They can exist on their own or be linked to a customer account. Here, Employee means a person associated with that customer; it does not create a Back Office staff login.
Before you start
Have the person’s first name, last name, email, and phone number with country code. Create the customer account first if you want to link the person now. If you use departments, add them to the customer account first.
Add the person
- Open CRM → Individuals and search by name, email, or phone to check for an existing person.
- Choose New Individual.
- Enter First name, Last name, Phone Number, and Email. These are required.
- Choose Send customer invite. Select Yes to invite the person to use their customer login, or No to record them without inviting them at this point. The form initially selects Yes, so review it before saving.
- If applicable, choose a Customer. Leave it empty for a person who does not need an account association yet.
- When a customer is selected, choose Type: Employee or Guest. For an employee, review the required Role and select any relevant Departments. The form normally selects Passenger as the role; change it only to match the person’s responsibilities. Guests do not use employee roles or departments.
- Save. If the form finds a possible duplicate, review the matches and use the existing person when appropriate. Choose to create another person only when you have confirmed they are different people.
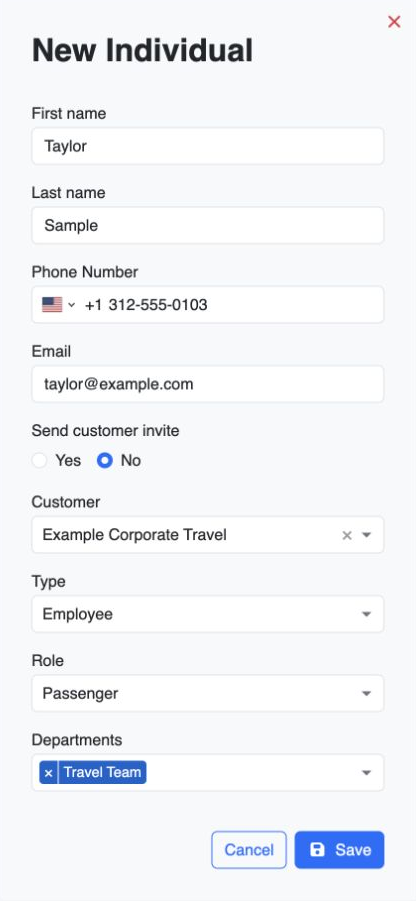
For example, a traveler who works for the fictional Example Corporate Travel can be linked as an Employee with the Passenger role. A visitor traveling on that account can be linked as a Guest.
Check the person’s details
Open the saved individual and verify their email and phone. Add useful addresses, pickup instructions, contact details, or notification preferences where your workflow needs them. Check that the correct customer association appears; for linked people, also verify the account’s Employees or Guests list.
If you sent an invitation, ask the person to complete it and confirm access to the expected customer account. Recording an email with Send customer invite → No does not create their sign-in at this step.
You are ready when
The individual can be found in CRM and selected in a test reservation, their contact details are correct, and any customer, role, or department association matches their intended use. If customer access is required, their invitation and sign-in have also been checked.
If you get stuck
- The customer is missing from the dropdown: create the customer first and confirm that you are in the same tenant.
- The person is linked to the wrong account: correct the association before making a booking on that account.
- Email is already used for a login: find the existing individual. Creating another record does not allow two people to share the same login email in one tenant.
- A duplicate warning appears for a shared email or phone: review the suggested people carefully; a shared contact detail can belong to different people, but their login identities still need to be distinct.
- You meant to add an operator or dispatcher: use Settings → Team & Permissions instead.