Bring the operator, a dispatcher, and one driver together for this check. A successful test shows that the records you created work together across Back Office, Studio, and the Driver App.
Before you start
Complete the earlier setup steps. You need an active driver, an available vehicle of the right type, a customer and passenger, and a working rate plan in the same tenant. Check the company, driver, and vehicle in Compliance → Overview using the fleet readiness guide; resolve outstanding requirements before operating the trip.
Review Settings → Operations → Dispatch → Assignment rules with the dispatcher. Confirm Allow, Warn, or Block for each three-choice rule and the separate Different vehicle type switch. Follow the operations settings guide; do not change a company-wide rule just to clear this test.
Use a training tenant if one is available. Otherwise agree a controlled test with your team and use contact details you control. Saving a booking can send normal notifications and trigger configured payment behavior. Review Settings → Operations and Settings → Payments with the responsible operator before the test. Do not enter an arbitrary real customer or charge a card just to finish this checklist.
Choose a simple trip with a known expected price. For example, use a point-to-point journey for your standard vehicle type. Write down the pickup, destination, time, expected base fare, fees, and total.
1. Check the price in Studio
- Open Tools → Quote Calculator in the correct tenant.
- Enter the agreed route, pickup time, service, and vehicle type. For an hourly trip, enter the hours too.
- Select Calculate Quote. Check the base fare, fees, total, and currency against your expected result. If Studio cannot determine the company’s currency, resolve the error before continuing.
- For a customer-specific plan, select the intended Account under Advanced Options and check the displayed Rate Plan.
If the result is wrong, return to Pricing setup. The calculator checks account pricing; the passenger and booker can also influence the plan used in Back Office.
2. Create the booking in Back Office
- Open Dispatch → New Booking.
- Select the intended customer account, booker, and passenger. Check their contact details and any special instructions.
- Enter the pickup date and local time, pickup address, destination, stops if needed, service, vehicle type, and passenger count. Select complete addresses from the available results.
- Check the calculated price, currency, and payment arrangement. Compare the result with your Studio example, allowing for any passenger or booker rate-plan assignment.
- Review the notification recipients and operational notes. When ready to run the assignment test, choose Save.
- Find the saved booking in Dispatch and reopen it. Confirm the information persisted and record the booking reference.
Save as Quote is useful for checking a quotation, but it does not complete the reservation-and-driver test. Continue with a confirmed booking when you are ready to dispatch it. Avoid Save and Copy during this first check so you do not accidentally create a duplicate.
3. Assign and receive the trip
- Have the driver sign in, select the correct vehicle, and use Start Shift or Go Online, as configured for your company.
- In Dispatch, locate the confirmed booking and select Assign Driver. Choose the intended driver and review the vehicle shown with the assignment before saving.
- Confirm the driver and vehicle on the board. Resolve any assignment warning before continuing.
- On the driver’s phone, check that the booking arrives and the expected notification is received. Open the ride and compare the pickup time, addresses, passenger, and instructions with Back Office.
If the trip is scheduled for another day, check Trips as well as Today. If it is missing in Back Office, check the board’s date range and filters before creating another booking.
4. Check progress in both places
Follow the Driver App setup guide for the app’s action labels. During the agreed test journey, accept the booking, start toward pickup, record arrival, pick up the passenger, and complete the ride at the appropriate stages.
After each action, confirm that Dispatch shows the corresponding status. Check that the driver’s availability and location reach Back Office while online. Complete these actions only as the agreed test stages occur; do not advance an actual customer trip for practice.
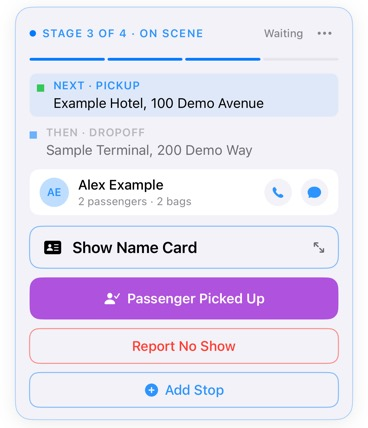
If a status does not update, refresh both views and check connectivity before repeating the action. Keep the booking reference and the displayed error so the problem can be investigated without duplicating the trip.
5. Check the financial result
Open the completed booking and review its final price, payment history, and remaining balance with the person responsible for billing. In Billing, check the relevant receivable, proforma, or invoice when your workflow creates one.
Trip completion, payment collection, and invoice creation are separate events. Do not assume that a completed ride has been paid or invoiced. If you did not test payment collection, record that as a remaining launch check and arrange an approved payment test for the configured payment method.
Launch checklist
Before accepting bookings, confirm:
- Tenant: each team member signs into the intended company and has the access they need.
- Company: contact details, office, currency, units, and time zone are correct.
- Fleet: the vehicle type, vehicle, and active driver can be selected for the intended service.
- Compliance: published baseline requirements cover the company, driver, and vehicle, and their document actions have been resolved. Missing baseline requirements mean unknown readiness.
- Pricing: standard and customer-specific examples return the agreed prices and currency, including fees and minimums.
- Customers: the account, booker, and passenger are correct; invitations and notification recipients are intentional.
- Driver App: the driver can sign in, select a vehicle, become available, receive the booking, and update it.
- Dispatch: assignments, location, and trip status are visible to the operations team.
- Billing: the team understands the payment and invoice result and has completed any required payment test.
- More tenants: the same checks have been completed separately for every tenant going live.
Record any unfinished checks and who will resolve them. Once this first journey works, repeat it for other vehicle types, services, special rates, and drivers before using those combinations with customers.
If you need help
Return to the setup step that failed, or contact OpenLimo Support. Include the step, booking reference, expected result, actual result, and the error shown. A clear repeatable example is more useful than changing several settings at once.