Create a driver in Back Office before asking them to use the Driver App. The driver record connects their identity, vehicle, permissions, and assigned work.
Before you start
Have the driver’s first and last name, their own email address, mobile number with country code, and hire date. Register the vehicle first if you will assign one now.
Create the driver
- Open Fleet → Drivers and search for the person to avoid creating a duplicate.
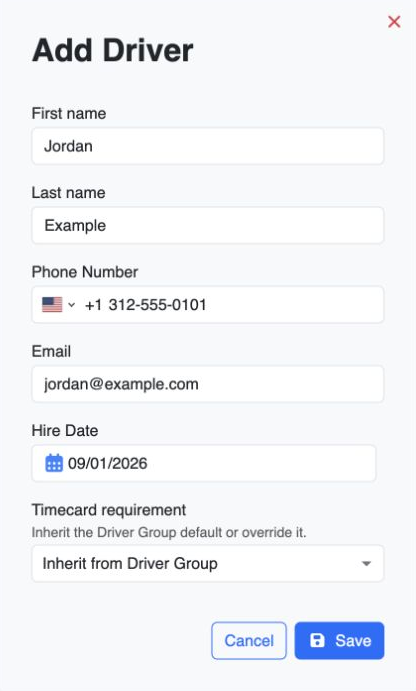
- Choose Add Driver.
- Enter First name, Last name, Email, Phone, and Hire date. These are required; the hire date cannot be in the future. Use an email the driver can access, because it is used for their login and invitation.
- If Timecard requirement is available, choose Inherit from Driver Group, Required, or Not Required to match your operation. Leave it inherited when group policy should apply. This option depends on the tenant’s Driver Timecards capability.
- Save. Driver registration also creates or links the driver’s sign-in identity and requests an invitation. Ask the driver to follow the invitation’s setup instructions.
Prepare the driver for work
- Open the saved driver and review Information, including contact details and Employment info. Confirm the driver is Active and select a home office if that field is shown and your operation uses it.
- If assigning a vehicle now, choose Assign vehicle at the top of the driver details. Search for and select the correct vehicle, then confirm the displayed plate and type. Use Change when replacing an existing assignment. You can also complete vehicle selection during the later Driver App setup step.
- Review the driver’s permissions. If your company uses Driver Groups, configure the appropriate group policy in Fleet → Driver Groups and check the driver’s effective settings.
- Review the read-only Documents summary, then open Compliance → Manage Documents to add or update the driver’s required license and other operational records. Check expiry dates.
- If you calculate driver pay in OpenLimo, review the Pay tab and the applicable plan in Fleet → Pay Plans. Do this before relying on settlement calculations.
- Review Settings → Operations for your company’s Driver App behavior. These settings will be used in the later Driver App setup step.
In Compliance → Overview, review published requirements and resolve the driver’s document actions using the fleet readiness guide. A driver without a baseline requirement pack has unknown readiness.
Emergency contact details and languages can also be added in Information. They are useful operational details, but are separate from the initial registration fields.
You are ready when
The saved driver appears in Fleet → Drivers for the correct company, their contact details and Active status are correct, and their invitation has been requested using an email they can access. Their driver identity and sign-in setup are now prepared. Confirm compliance readiness before assigning work; Active status alone does not establish readiness.
Complete the device sign-in, vehicle selection, permissions, and duty checks in the later Driver App setup step. Verify receipt and completion of assigned work in Your first booking, after pricing, customers, and individuals are set up. You do not need a test booking to finish this driver-record step.
If you get stuck
- Email is already taken: find the existing driver and check the company before trying to add another record.
- Invitation has not arrived: check the saved email and the driver’s junk folder, then ask your administrator to investigate the invitation.
- The vehicle is missing: confirm that it exists in this tenant and search by plate.
- Timecard settings are locked: the tenant’s Driver Timecards capability needs an administrator’s review.
- The app opens but no trip appears: confirm the selected company, driver assignment, and trip status with Dispatch.