Set up the classes of service you sell before adding individual vehicles. For example: City Cars is a fleet, Airport Transfer is a service, Sedan is a vehicle type, and the sedan with plate ABC123 is a vehicle.
Before you start
Complete company and locations. Gather each vehicle’s year/make/model, color, VIN, plate number, ownership status, and purchase date. Check existing records first so you can reuse what has already been set up.
Prepare your fleet and services
- Open Fleet → Fleet and select your fleet from the dropdown.
- If the fleet is missing, use Add Fleet in that dropdown and enter its name. Use Edit Fleet to review the existing brand and contact information.
- Select the service you offer. If needed, choose Add Service Type, enter its name, select Status and Minimum Driver Certification Level, and save. Description is optional. Use an active status for a service you intend to operate.
- With the service selected, review its Vehicle Types. Use the existing types where suitable.
- To add a type from the catalog, choose Import Vehicle Type. Select the required entries, move them into Selected for import with the arrow, and choose Import selected vehicle types.
- Open each relevant vehicle type and review its name, passenger and luggage capacities, status, and booking-channel settings. Enable customer visibility only for classes you intend customers to book. Review quote-required behavior where used.
Vehicle types are shared catalog records within the tenant. Check their service associations before making changes that affect other services. An imported type defines a class of vehicle; it does not register an actual car.
Register a vehicle
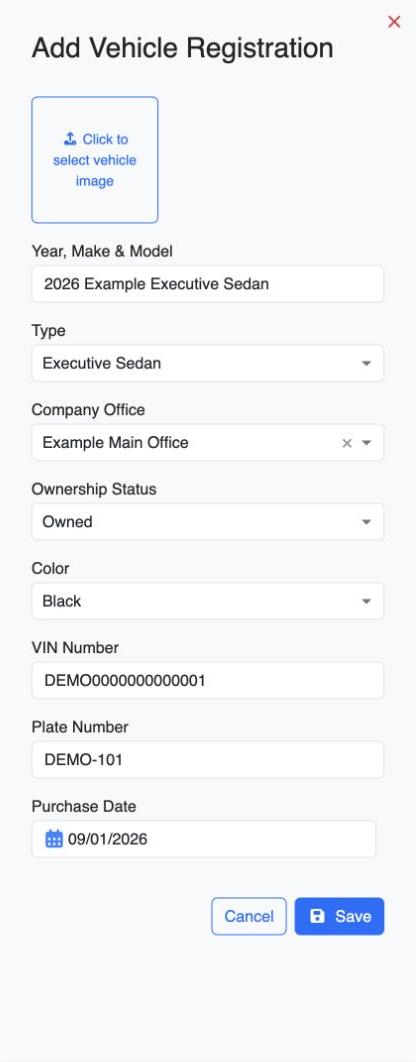
- Open Fleet → Vehicles and choose Add Vehicle. The form is titled Add Vehicle Registration.
- Enter Year, Make & Model, choose Type, and complete Ownership Status, Color, VIN Number, Plate Number, and Purchase Date. These are required by the Back Office form.
- Select Company Office if you want to associate the vehicle with a location. An image is optional.
- Save, reopen the vehicle, and check the type, plate, and active status.
- Review the vehicle’s document summary, then open Compliance → Manage Documents to add or update its registration, insurance, and other required records. The profile summary is read-only. Keep expiry dates current.
Repeat for each physical vehicle. Use the plate and VIN to distinguish similar cars.
Open Compliance → Overview and check each vehicle against its published requirements. Resolve missing, expired, or pending-review records in the Action queue. A vehicle without a baseline requirement pack has unknown readiness; follow the fleet readiness guide before dispatching it.
You are ready when
Your service shows the intended vehicle types, each car appears in Fleet → Vehicles, and the correct car can be found when assigning a vehicle to a driver. Check its compliance readiness before using it for work; an active vehicle record alone does not establish readiness.
If you get stuck
- There are no vehicle types for a service: select the correct fleet and service, then check the type’s service association or import it if it is absent from the tenant catalog.
- A type is missing from customer booking: review its active status and Booking Channels settings.
- Import or Add reports a limit: have your administrator review the plan’s vehicle-type or vehicle allowance.
- You cannot find a car: clear list filters and search by plate before creating another record.